How to Drive a Car | What to Do if You Get a Flat Tire
Learning how to drive a car includes learning about fixing and maintaining your tires. Tires wear out or can be damaged by driving over a nail. This will cause the tire to lose air and go flat. Since this is a common occurrence when driving a car it is important to know how to change a tire. Your learn to drive program should include this as an exercise. You can find more information on tires in Driving Lesson 6 – N2K. Click the link below.
Learn to Drive: Driving Lesson 6 – N2K
One day you’re driving a car, minding your own business, when all of a sudden…….the steering wheel gets “heavy” and the car pulls sharply to one side – or – your ride suddenly gets very bumpy – or- someone sees you and yells: “Hey kid! You’ve got a flat tire!”
Chances are – you have a flat tire! So what do you do?
What causes a flat tire?
|
You need to slow down gradually and pull over in a safe spot as quickly as you can. Don’t continue to drive on it. You could damage the wheel and other parts of the car and your repair bill will soar into the thousands! But worse, you risk losing control of the car and getting into a serious accident. You really need to get safely off the road ASAP.

Next, get out of the car and walk around it. You may see which tire is flat immediately. If you can’t tell which tire is flat, use your handy-dandy tire pressure gauge to check your tires.
If you’re lucky and have a Roadside Assistance plan, you can call their emergency number and wait in the comfort of your car until a pro comes to change the tire for you. But you should still know what to do – just in case you get stranded somewhere that help is not available.
Changing a tire is dirty, nail-breaking work and, with luck, you may never need to do it. But just knowing that you could do it, if you needed to, is empowering! Knowing what to do when you learn how to drive a car and being able to take charge in an emergency could also make you someone else’s hero.
Be sure to practice changing a tire at least once as you learn to drive. Make this as part of your “Learn to Drive” checklist. Look for more information in Chapters 3 and 8 in the Workbook.
Step-by-Step Instructions for Changing a Tire
1. Make sure you’re in a safe location. The car must be on a level road – not a slope or a hill. Move to the right-side shoulder of the road if you can’t get off the road completely. You need enough space around the car that you’ll be able to work without being in danger of getting hit by another car.
2. Put the car in “PARK” and set the parking brake. If you drive a standard car (manual transmission) make sure you put the car in gear. DO NOT leave it in “neutral”.
3. Turn the engine off. Turn on your emergency lights and lift the hood to warn other cars that your car is out of service.
4. Wedge a piece of wood (or other solid object) behind one or two other tires to make sure the car won’t slip or move while it’s on the jack.
| Note: Your car’s Owner’s Manual tells you where to find your jack and how to work it. Jacks are often located under the carpet in the trunk or rear of the vehicle but they can be in other spots as well. Your Owner’s Manual should be n the glove box. When you learn to drive a car you should take a look through the Owner’s manual |
5. Get your tools ready. You’ll need the car’s jack, a lug nut wrench, the spare tire and something to put the lugnuts in as you remove them. Have your 3-in-1 oil ready in case you need it and a cloth or paper towel to wipe your hands would be good too. If you don’t remember exactly what to do, keep this book or you Owner’s Manual nearby.
6. If you can’t see lug-nut covers on your hubcap, pry off the hubcap.
(Fancy hubcaps? Some fancy hubcaps have plastic covers over the lug nuts. In this case you must loosen the lug nut covers before you remove the hubcap. Use your lug wrench to gently loosen each lug nut cover. One turn should do it. Then use your fingers to loosen them the rest of the way. They won’t come off completely because they’re part of the hubcap. Once they’re loosened, you can use the other end of your lug wrench to pry off the hubcap.)
7. Use the lug wrench to loosen one lug nut. DO NOT REMOVE IT. To loosen you’ll be turning it counter-clockwise. (Remember “Right-y, tight-y. Left-y, Loose-y.”)
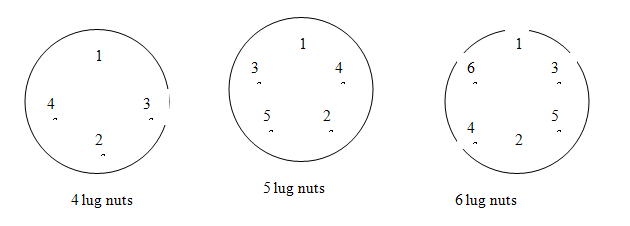
8. Next loosen the lug nut OPPOSITE it. Continue loosening the nuts in a star pattern, until all of them have been loosened. (Always loosen nuts across from each other. Don’t loosen nuts next to each other.) SEE “How to Use a Lug Wrench” following.
TIP: If a lug nut sticks, lubricate the base with 3-in-1 or similar oil. Spray it on. Wait a few minutes and try again. Repeat until the nut loosens enough to get it off – but don’t remove it.
| Warning:* Cars can slip off jacks. NEVER get under a car that’s held up by a jack. |
9. Carefully jack up the car. It’s important to place the jack in the right place. Each car is different. Your Owner’s Manual will tell you where to place the jack and how to use it. Jack up the car high enough that you’ll not only be able to remove the old tire – but also so you have enough room to move the new tire into place.
10. Remove the lug nuts. You can use your fingers to unscrew them the rest of the way. Put them in a container or somewhere they can’t get lost or roll away.
11. Remove the flat tire and move it out of your way.
12. Lift the new tire onto the wheel studs and push it snugly into place. Make sure the air valve (that you use to fill the tire with air) is facing outward.
13. Replace the lug nuts. Put them back one at a time – always across from each other. As you replace them, give each one a few turns with your fingers to keep them in place.
14. When they are all in place and “finger-tight”, use your lug wrench to tighten them fully. Always work in your star pattern – working back and forth across the tire. Do not tighten the lug nuts consecutively.
15. Slowly lower the jack and remove it.
16. Now re-tighten all the lug nuts with your lug wrench. You want them as tight as you can get them.
17. Replace the hubcap – making sure it’s secure. You don’t want to lose it.
IMPORTANT: If your car has a “donut” (small-size) spare, you need to exchange it with a full-size replacement as soon as possible. Don’t keep driving on it.
Learning to Use a Lug Wrench as you Learn to Drive
Fit the lug wrench securely onto the nut. Pull the handle upwards with slow and steady pressure. (If you push the lug wrench downward, you risk getting scraped knuckles if it jerks suddenly.)
Use your knees to pull the wrench upward – not your back.
Remove the lug nuts in the order shown below.


